
This is a report on my installation of a small block Ford motor into a ’71 Datsun 240Z – I refer to it as a Z8. I’ve always loved the looks of the early Z-cars, and the sound and power of Ford 289/302s, and happened to have an engine “in stock,” so decided that I would do the project. My goal was to make a high performance street car with subtle cosmetic enhancements, but still appear fairly stock to the innocent bystander. I wanted everything on the car to work as original after the transplant. Since this is an "all for fun" sort of project for me, I decided that I would try to do everything right, and not be so concerned about the cost of things, and how long it takes to do it. Even with buying the car, restoring it, the chassis changes, an interior redo, and a paint job, I figured that it would be way cheaper than anything else of comparable performance and looks. And what’s a hobby for if it isn’t a way to use up time and extra funds?
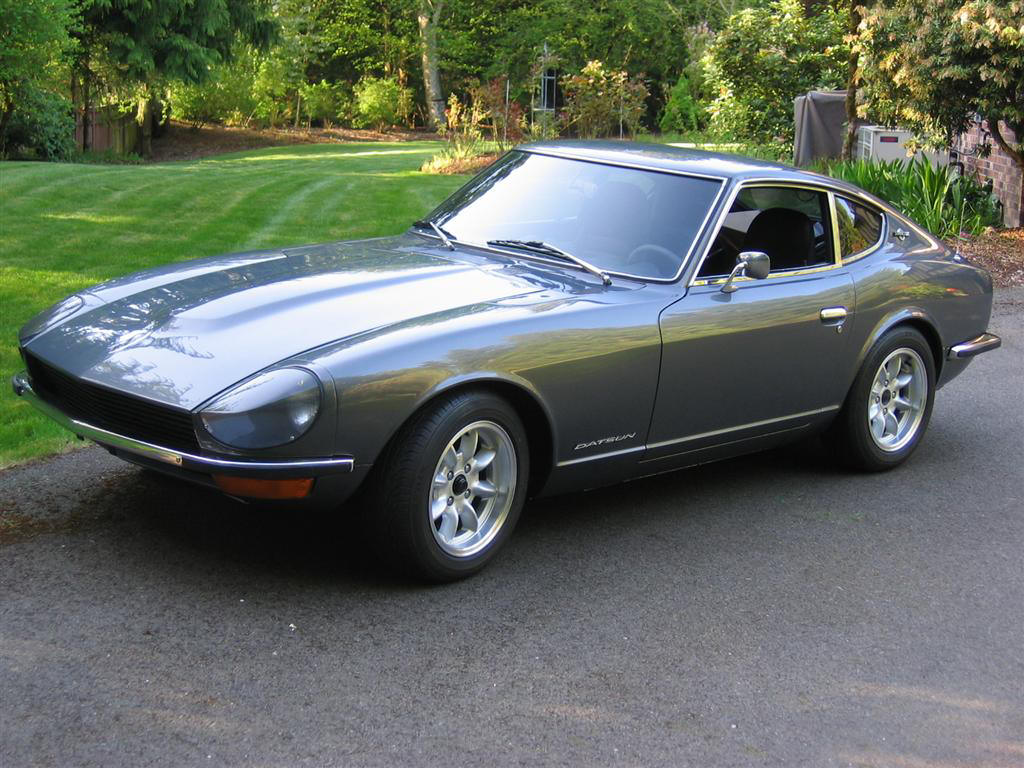
Here's what the completed Z8 looks like on the outside.
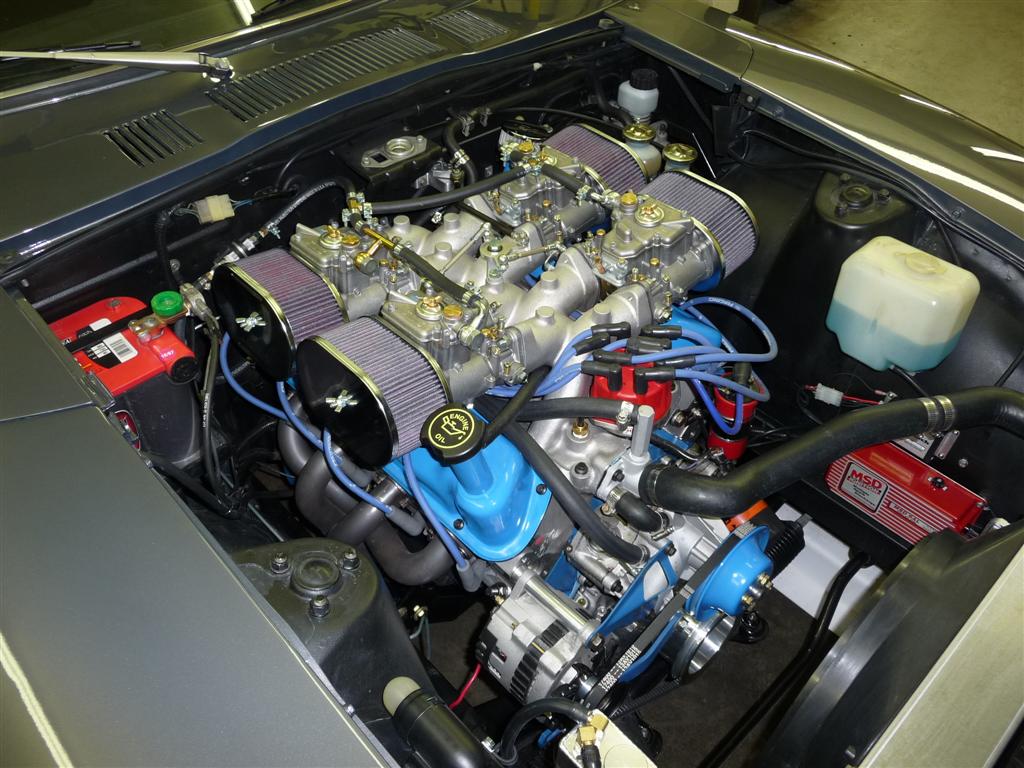
And this is what it looks like in the engine compartment. Motor fits in there with plenty of clearance on both sides and the front. As easy to work on as the stock motor.

There are kits available to put small block Chevy motors in Z-cars, and consequently this seems to be the most popular route. However, the Chevy motors are heavier and larger than the Ford motors, and with the rear-mounted distributor must be mounted further forward and higher. What could be better than a small block Ford motor that is lighter than the stock Z motor, can be mounted further back for better weight distribution, has better exhaust sound and torque than the stock motor, and over twice the horsepower? Unfortunately, there doesn’t seem to be much documented about Ford conversions, so I was charting some territory without much helpful folklore on the web.
I’m writing this so that it might be of some help to others interested in this conversion. If you do go ahead with a similar conversion, it will hopefully save you time and the purchase of parts that don’t work since you can take advantage of my research and mistakes. I've included a parts list and drawings for many of the parts I made.
I am lucky enough to have a well-equipped shop with lots of room and lighting, a lift, milling machine, lathe and welding equipment. While you can do the job without this equipment, it would take longer and require some professional assistance to have some of the parts made. I’m also lucky enough to be retired so I have a lot of time. And the project needed it. Once I found a Z, I worked almost full time in the shop for a little over two months to do the conversion, although that time also includes doing a restoration of all of the running gear too. It could be done in less time if you aren’t so picky about the details and/or choose to not make all of the modifications that I did. It could also be done a lot cheaper in these same cases.
This is good old fashioned American hot-rodding. Just make the car the way you want it. If you think it will work and look good in your eyes, just do it! There are many “right” ways to do it, mine is just one way. I've been criticized for taking a stock 240Z out of the pool, but I think the pool of 240Zs is pretty large, and won't miss a few cars that are used for other than restoration purposes.
Excuse me for the odd order of this. You will see pictures and tasks that are out of sequence. That’s because I tried to be generally sequential, but in some cases grouped things about one subject together. Not entirely though – you will still need to read everything if you want the full scoop. To make the order even odder, I built the car with one motor (4-barrel 289), so that is in most of the pictures and report, but then I built a different motor (Weberized 331 stroker-motor), so you will see the two intermixed in the order.
How does it drive? Well, in a word, fast. In two words, plenty fast. I’m very satisfied with its performance. It isn’t overly loud inside, but has a nice exhaust tone outside. It handles just as well as a stock 240Z, which is flat cornering, comfortable ride, and pleasant drivability. It feels tight and nice. It effortlessly hums along at about 2,500 RPM at 70 MPH. Care is required in first or second gear: if you punch it, both rear tires break loose. Fun!
Please feel free to email me if you have questions or comments.
So let’s get on with it…
The motor we're working with...
Preparing the motor for a trial fit...
Mounting the motor and transmission...
The differential and driveshaft...
Pulling the motor and attending to the rest of the chassis...
Installing the motor for hopefully the last time, and clutch headaches...
Miscellaneous hookups, fuel linkage, air filter, gauge connections...
Revisiting the rear end for more changes...
More power (like we need it)...
Weights and measures department...
Parts lists and fabrication drawings...
I hope that you enjoyed reading about this project.
I've had a number of people read this web site, then ask me if I would build the motor cradle and transmission mount for them. While I like to help my fellow car enthusiasts, it's not practical for me to make one for everyone who asks. Consequently, I decided to have a shop make up a small batch of mounting kits, and I'm making them available to people who run across this web site and want to build their own Ford-powered Z-car.
To find out more about the kit, go to: Motor/Transmission Mounting Kit