This is the story about the transmission...
that turned into a Datsun-powered Morris Minor Woody
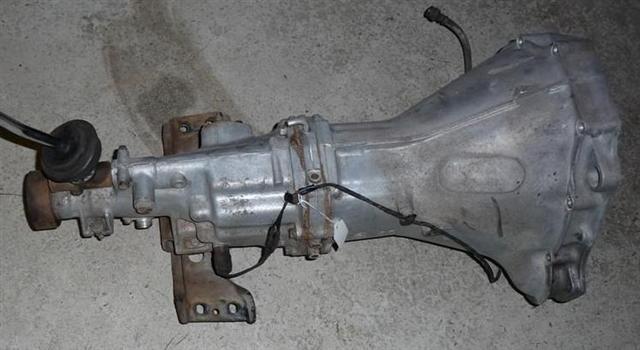
A popular conversion for British cars, such as AH Sprites and MG Midgets, is the use of a Datsun 5-speed transmission. This not only gives you synchromesh in all the gears, but the fifth gear is an overdrive which will allow these cars to operate much more comfortably at freeway speeds. After using the 5-speed conversion in my Bugeye Sprite, I keep my eyes open for Datsun transmissions applicable for this purpose since they are getting increasingly difficult to find.
I ran across a derelict ’79 Datsun with the desired transmission, so had to haul it home. After I pulled the transmission, I noticed that it had the A15 motor, which is the largest of this series. Datsun originally built A-series motors under license from BMC, so they are very similar to the early British motors used in Sprites, Morris’s, Midgets, Minis and others. Datsun found ways to make improvements, such as making them less prone to leak, with more reliable electrics, and very long life spans. This isn’t to say that the A-series BMC motors aren’t good too; it’s just that the Datsun motors are very good.
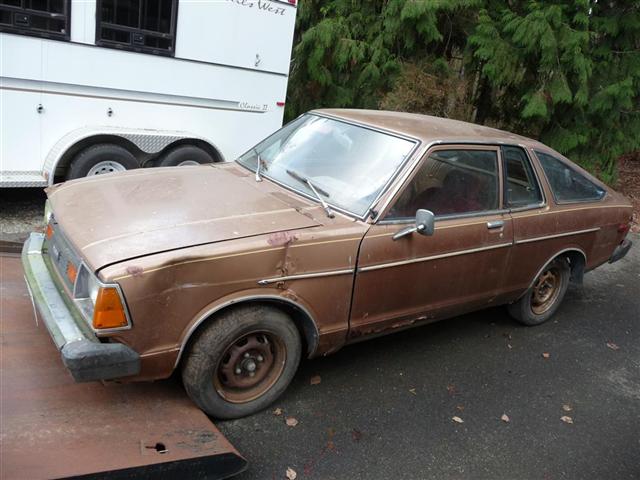
I have to admit, the donor car wasn't prepared to be entered into a concours or beauty contest, but it was only $200, and had the desired 5-speed. I took all the parts I wanted from it, then sold the remaining hulk for $100.
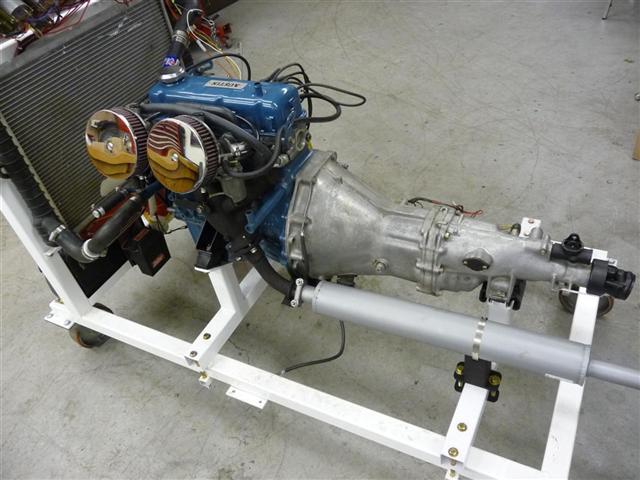
Since it was an A15, I decided to pull the motor too, and put it on an engine stand in the corner of my shop.
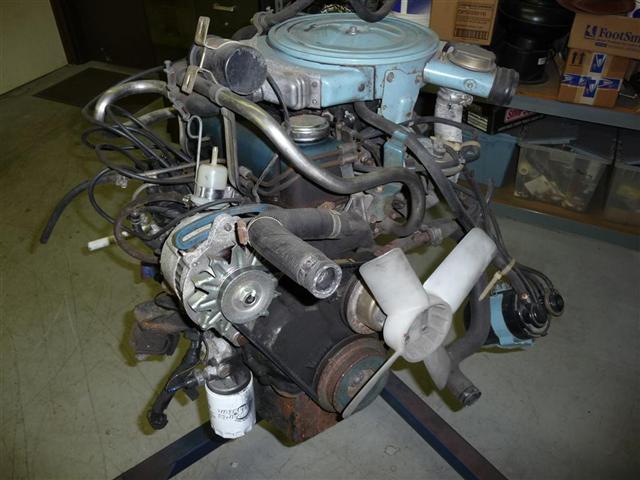
After looking at it for a few months, I decided I better either get rid of it or rebuild it, and decided on the latter. I found a major rebuild kit, very reasonably priced, with new pistons, bearings, lifters, cam gear, etc, and took the block and head into a machine shop to have it bored and the valves ground. I found that Delta Cams, nearby in Tacoma, regrinds cams, and even offers a variety of grinds – at a very fair price. So I chose to have it reground with a little more zip to it than stock.
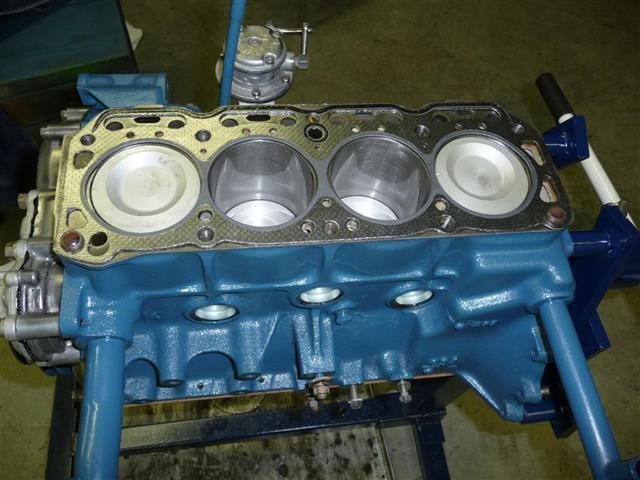
This is when things start to get more fun - reassembling parts that you have cleaned up and refurbished or replaced as necessary. I decided to paint the motor Chevy blue.
The original carburetion on these engines was a two-barrel, progressive linkage Hitachi. Unfortunately, while they can be made to run well, these were built in the early days of emissions controls, so are encumbered with an amazing number of vacuum hoses, solenoids, and other smog-related complications. So I decided not to use the stock intake setup. The next alternative was a Weber DGV setup, which is a generic 2-barrel downdraft carb that can be adapted to a wide variety of engines, either with stock manifolds with an adaptor, or aftermarket manifolds, such as those offered by Cannon. I’ve run the DGV carbs on several cars though, and they usually seem to have a little bit of a flat spot, just off idle, so I decided to forgo that option too. Then I investigated the possibility of a single side-draft Weber DCOE carburetor, which I love the looks of, and would be about the right size for a 1500cc motor. Unfortunately, the only manifold that I could find seems to need a special exhaust manifold to be able to fit under the intake manifold. So I scratched this idea too.
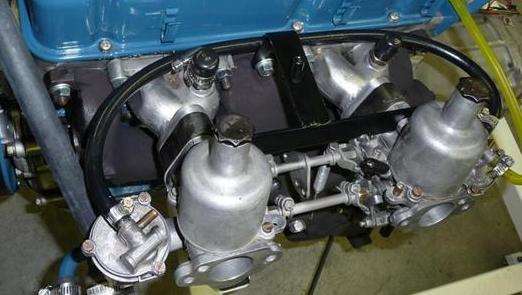
Since I was intrigued with the British origin history of this motor, I decided that I would see if I could make a pair of SU carburetors work. I’ve always liked the elegant simplicity of SUs, and they seem to run well once initially adjusted properly. The problem is that there are no manifolds on the market for this adaptation. (Note: I found out later that there were some twin-SU-style manifolds made by Nissan for this series of motors, but they are few and far between.) So I decided to cut the original Datsun manifold into two stubs, and weld SU-pattern flanges onto the end. I discovered that the factory manifolds are slightly different fore and aft, so ended up cutting two manifolds and using the same end of each. While I originally figured that I would use HS4 SUs (1 ½” diameter venturi), the manifold size was only big enough to accept HS2 (1 ¼” venturi) carbs, so I used those, even though they are a little smaller than ideal for a 1500cc motor. After the flanges were welded up, the only other modification was to lengthen the linkage between the carbs a little bit.
Incidently, the size convention of SU carburetors is based on the number of 1/8” increments above one inch. So an H2 is 1 ¼”, H4 1 ½” and H6 is 1 ¾”. Likewise, fluorescent lamps are numbered as the diameter in 1/8” increments. So, for example, a T5 lamp is 5/8” diameter, T8 is 1” diameter, and so on. How did I get off on this tangent?
When I rebuilt the carbs, I bought a master rebuild kit that included new throttle shafts with bushings. I had a local machine-tool-sharpening shop make me a special piloted reamer to bore the carbs for the bushings. After measuring though, I found that all the slop was in the throttle shafts, not the carb body, so replacing the shafts tightened everything up fine without installing the bushings. I've since found the same thing on another pair of similar carbs. Lesson learned was that the shafts wear instead of the body on HS2s, so don't waste time and money trying to rebush - just get new throttle shafts.
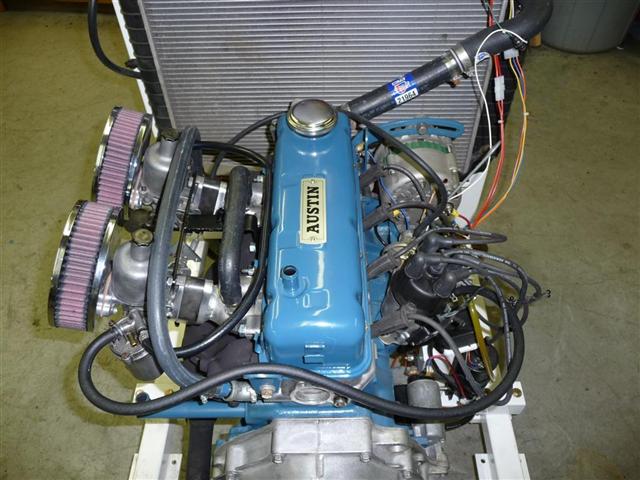
Once I had assembled the motor, I decided to make an adaptor for my engine run-in stand so that I could fire it up and break it in a little. I even got fancy and installed a muffler on it to save what little hearing I have left. The muffler was originally intended for a Massey Ferguson tractor. I used some high-quality Lucas break-in oil additive since most modern oils aren’t good enough to break-in flat-tappet cams without failures. Amazingly enough, the motor fired right up, and actually ran well with the SUs. I was shocked. It idled even better when I installed a cross-over tube between the front and rear manifold sections. Now that the motor looked pretty British, sporting its SUs, I screwed an Austin plate (left over from my Mini) onto the valve cover to further the deception.
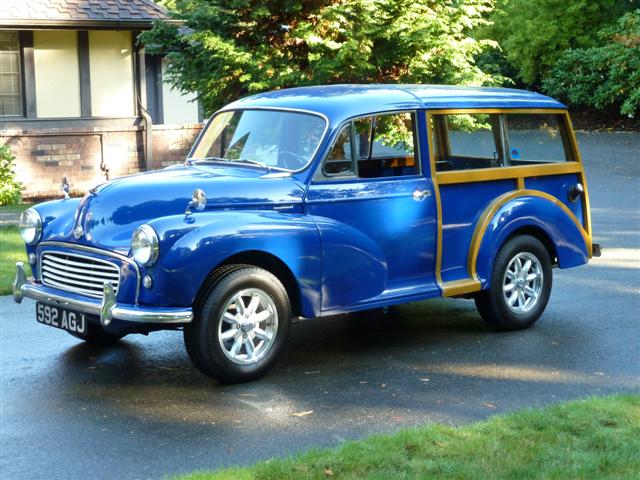
So, now I’ve got this freshly rebuilt British-looking engine/transmission, just begging to go into a British car. I start to ponder various target vehicles. I finally settled on a Morris Minor. I had driven a couple of these through the years, and appreciated how civilized and practical they were. Sort of the British version of the VW Beetle. BMC literally sold well over a million of these cars over the years. The Minors were designed by Sir Alex Issigonis, the same engineer who later designed the Mini. He was brilliant at optimizing space in his designs, and even though the Minor was designed in the late 40’s, it sported unibody construction, torsion bar suspension and rack and pinion steering. Issigonis also wanted to use a flat-four motor with front-wheel drive (a’la Subaru), but couldn’t get the development funding.
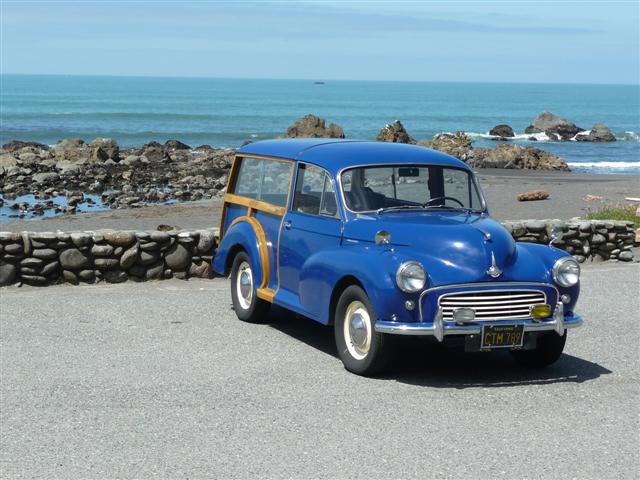
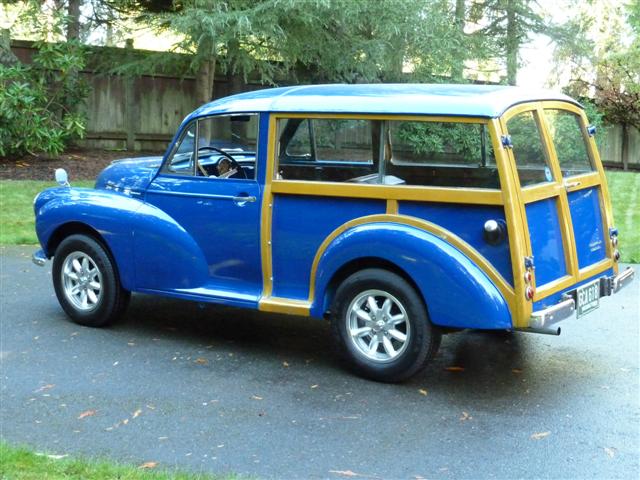
The more I investigated Morris Minors, the more I became attached to the station wagon, or "estate" version, called the Traveller (note the extra L). The Travellers were built similarly to the sedan, but had a wood frame and aluminum (I mean “aluminium”) panels added. This was performed at the factory that was idled after production of the MG TD/TFs had ceased. They had the capacity and the expertise from the T-series wood framework. The Traveller was so popular, that it remained in production after the sedan production was stopped. The final Traveller rolled off the assembly line in 1972. The basic Morris design was so good, production lasted almost 25 years. They were available as two and four-door sedans (saloons), wagon, pickup, and van versions. The vans were used by the postal service in England.
I finally located my Traveller in California, via an outdated eBay listing that didn’t meet reserve. The Traveller had about 88,000 miles, was left hand drive, and presumably, until recently was owned by a church. It was described as having no rust, running well, and having a “10-foot” paint job. It sounded perfect to use it as-is, after a few mechanical upgrades.
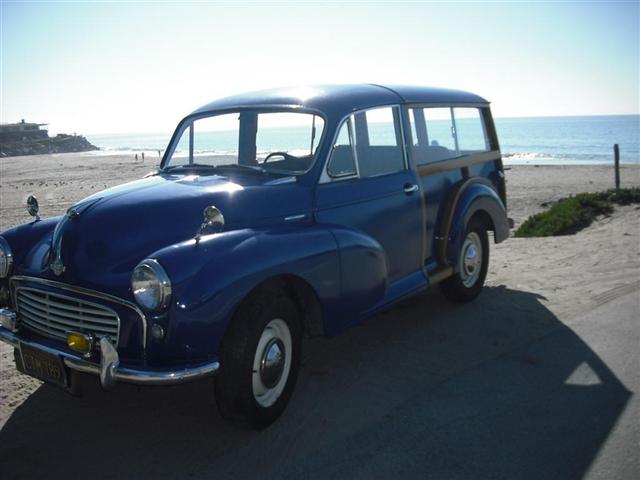
I decided to take a chance on driving it back to Seattle from south of the San Francisco bay-area. I packed up a bunch of tools and spare parts, and my son Ben took a couple of vacation days to accompany me on the quest. Since the car wouldn’t be suitable for freeway use, we planned a trip up coastal secondary roads which would be about a thousand miles. The seller agreed to meet us at the airport. After initial discussions about whether the car was roadworthy, and the seller saying "absolutely," when he learned that I planned to drive it home he insisted that I sign an agreement holding him harmless if anything went haywire on the way home. Hmmmm.
After we arrived at the San Jose airport early in the morning, we waited anxiously for him to arrive. Eventually we see the woody coming down the road. I can see from quite a distance that he was a little loose about the “10-foot” paint job. I must have a lot better eyes, because it’s looking to me more like a 100-foot paint job. While I expected chips and minor scratches, I didn’t expect the paint to be crazed in many places, the result of incompatibility of an earlier repaint, and also didn’t expect some of the rolls and bumps in the body. In retrospect I can see how the pictures he provided were posed with the bad spots out of the sun. Live and learn. Fortunately, he was mostly correct in his description of rust. The car was good in that regard with the exception of some bubbling at the base of the driver’s door. Pre-purchase shots like this can hide a lot of ills...
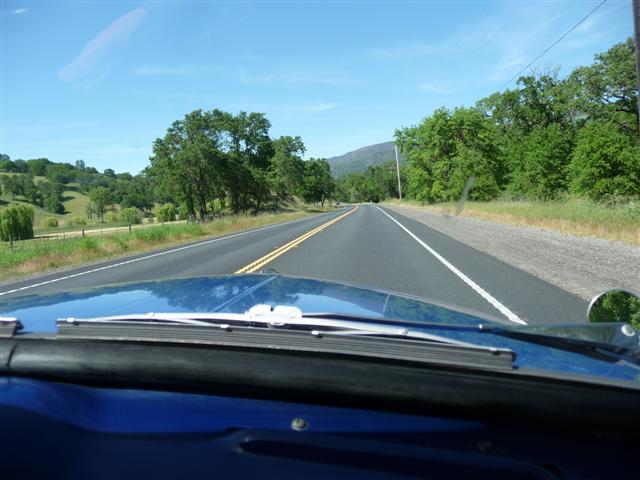
After a two-minute orientation of the car, he speeds off with his wife in his Jaguar, and we amble off with the Morris. I had calculated that 55 MPH would be 4,000 RPM, so we could probably cruise at that speed once we got out of town, but that was pushing it a little. The car started to have a shake at about 53, even though the tires had been recently replaced and balanced. And, if you were on much of an incline, there just isn’t enough power to go that fast. Even though this ’58 Morris-1000 has the upgraded 948cc motor and only weighs about 1,800 pounds, it’s still only 37 HP. Acceleration can best be described as “leisurely” or “slow.” Interior room is ample for my son and I, even though we are both over 6’ tall. The rear seat folds down to make a commodious flat storage area in the back, so there is plenty of room for our luggage and tools. We even felt confident enough to stop at a Costco for a couple cases of whiskey. In California, it’s about half the price of the same in Washington.
The mirrors, mounted on the front wings, look neat, but don't provide much visibility, and the rear view mirror inside the car looks straight into the posts in the middle of the back doors. However, if you move your head around, visibility is great in almost any direction.
The Traveller needed frequent gas stops. Even though it gets good mileage, the tank is small at 7 ½ gallons. And we find that at every gas stop, it liked to have another quart of oil. It was burning enough so that we felt compelled to leave some windows open at all times because of the fumes, and as the trip progressed, the back doors and windows got covered with an oily film. Speaking of stops, the brakes aren’t all that good at stopping. Small drum brakes all around make the car so that it’s slow to get going, and slow to get stopped. Even though it can go 55, it wasn’t designed to make rapid stops from that speed. But, one has to cut the designers some slack here, when it was first introduced with these brakes, it only had an 817cc flat-head motor with 27 ½ HP.
The hearty little Traveller motored along without problems and we rolled into my driveway after three days on the road without the need to get out a single tool! We got a lot of thumbs-up along the way, and enjoyed the trip. Final consumption figures for the trip were 28 ½ MPG petrol, and 910 MPG crankcase oil
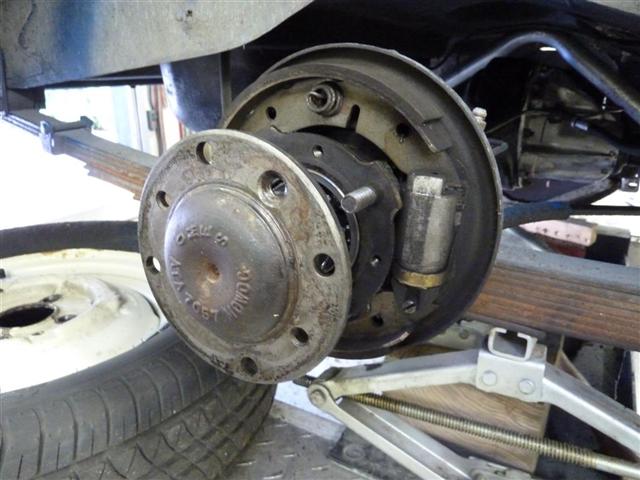
Shortly thereafter the fuel pump started to give up, and when I disassembled the front hubs, I found that on one side, the wheels bearings were very loose and close to failure. I'm glad the trip wasn't much longer!
Even though it comported itself well (albeit slowly) on the way home, I decided that the engine swap was really necessary if I was going to be able to use it as practical driver in today’s world. It simply isn’t fast enough except around town and for short trips on back roads without hills. But, I wanted to do the swap so that it is easily irreversible if someone wants to bring it back to stock some day.
An alternative to the Datsun motor would be to install a later 1275cc BMC A-series motor. This would be a bolt-in operation, and would still have ample power for most needs. My Bugeye Sprite has this motor along with a 5-speed, and is happy at freeway speeds, but it also weighs about 400 pounds less than the Traveller, and is more aerodynamic (both have a frumpy way of aerodynamics). I decided to go ahead with the Datsun swap. I found that the Datsun swap has been done before, particularly in Australia and New Zealand, so there were some helpful tips on-line. Also, a local friend, Russ, inspired me with his Datsun-powered Minor Saloon. His car has a similar Datsun motor, but with an automatic transmission.
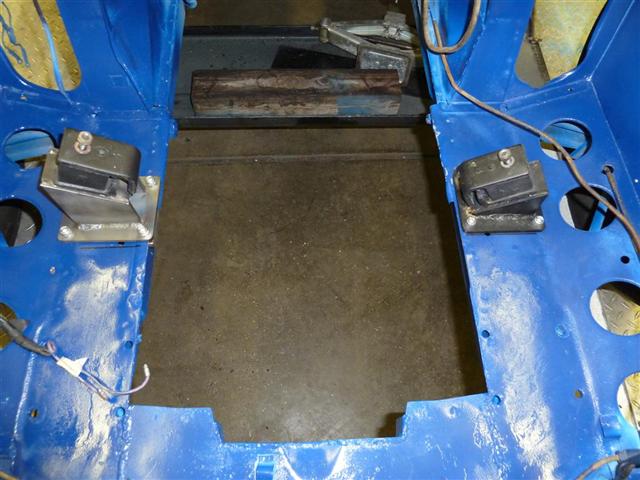
The Datsun motor is a good fit into a Morris Minor, except that it is very tight in length. In order to make it fit, it’s necessary to make a relief in the front cross member. The cutout is only necessary to get the engine in and out, once the motor is in place, the engine sits behind the cutout. Here I'm welding in the filler panel...
I made motor mounts that bolt to the Morris frame, and use the stock Datsun rubber mounts. They bolt a few inches to the rear of the original mounts, with one side higher than the other. This is what they looked like in raw fabrication state...
The stock oil filter looked like it would need part of the frame flange cut away for access, but I found a small filter (same as John Deere Gator) that installs without any modifications to the Morris.
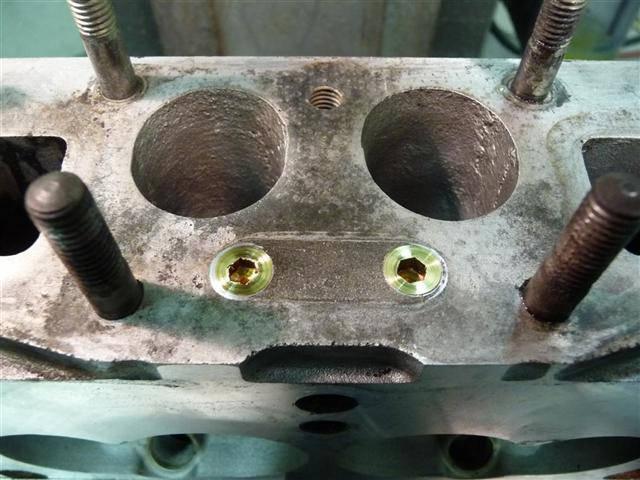
The cutout in the front (which is hidden by the radiator), and the four ¼” holes on each side for the motor mount are the only changes necessary to the Morris platform for this conversion. Everything else bolts to existing holes and no other cutting or drilling is required. As a result, the car could easily be restored to the original motor if desired - it would bolt right in. However, I think you would have a hard time enjoying the original motor after driving it with the conversion.
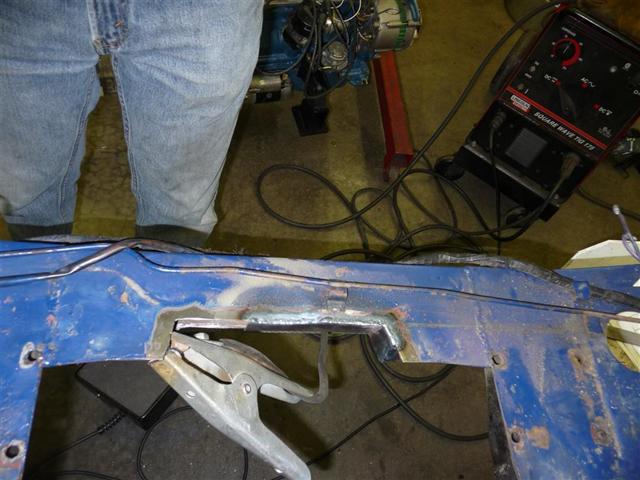
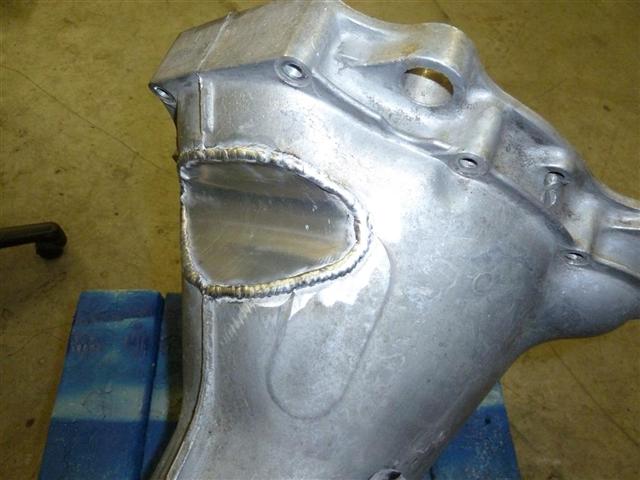
Since the rack of the rack and pinion steering is mounted above the transmission, it’s necessary to take a slice out of the transmission bell housing. I made an aluminum filler panel and had it welded in place.
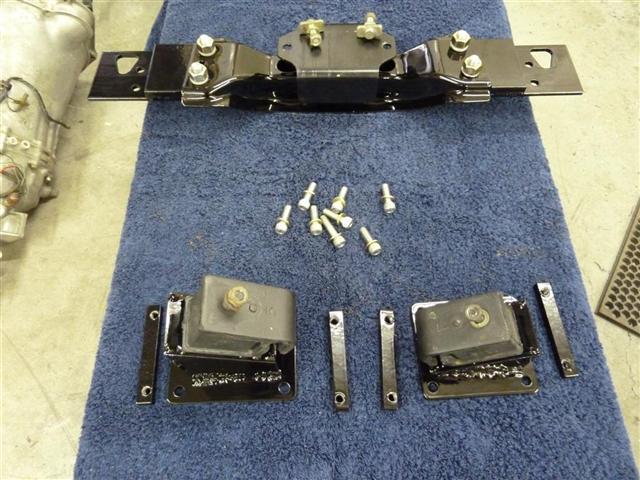
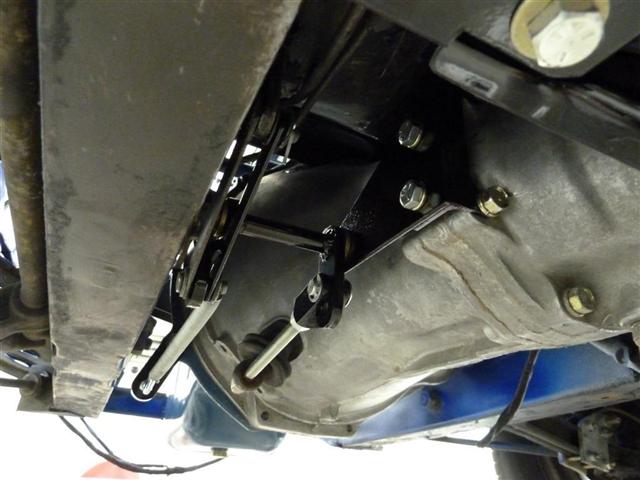
For supporting the transmission, I made brackets that use the original Datsun cross-member and rubber mount. I like the idea of using Datsun factory-issued mounting for the engine/transmission since it was engineered just for this purpose. This picture shows the engine mounts at the bottom, and the transmission mount at the top. The "wings" allow the original Datsun transmission crossmember to be bolted to the existing holes in the frame that were originally used for the Morris transmission mount.
For the clutch linkage, I made a bracket that mounts to the transmission, and also uses the original clutch linkage point on the frame. Same idea as the original Morris, but I changed the geometry a little bit so that it increases the leverage. By using a shorter “output” arm, the clutch lever still moves plenty far and is easy to press. It works very smoothly and the clutch is pleasant to use.
For the speedometer, I bought a kit from Rivergate (the folks who make the adaptors for Datsun transmissions into Brit-cars) that has an angle drive and speedometer cable to mate the original speedometer with the Datsun transmission. The angle drive can be configured with different gear ratios to make the speedometer read correctly. If the one Rivergate originally sends you isn’t correct, they will exchange it for one with the correct ratio at no cost. Nice folks. I ended up with a 1.4:1 adaptor.
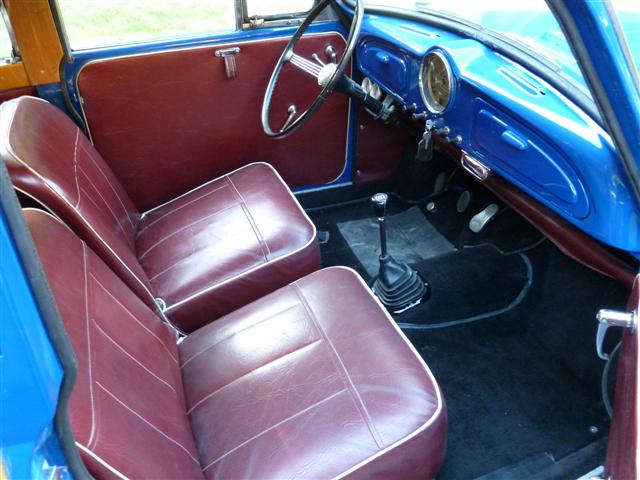
The shift lever wasn’t quite the correct shape, so I heated it at the bottom and bent it so it was about right. It is slightly to the left side of the opening, so the original boot won’t fit. I visited Pull-A-Part wrecking yard, and brought home a few boots. One of them worked fine with the original trim ring. Alternatively, you could cut the gear lever, and weld it beside the stub so it would come out in the center, it's that close. I tapped the original Morris gear shift knob for metric threads, and it screwed onto the Datsun gear lever. Looks stock inside and out now, no one would guess there’s a different transmission (or engine) underneath.
The Morris Minor 1000s used 4:55:1 gear ratios in the back, hence the high RPMs at cruising speeds. I like it when you are at low RPMs when cruising, and the 5-speed is a big step in that direction with its .821:1 overdrive. But I thought that’s still pretty high, so I bought a really tough-looking ’69 Sprite to get the differential and front disk brakes. The 1275-powered series of Sprites (and MG Midgets), from the mid '60 to early '70s have a 3.9:1 ratio. Some of the very late Spridget 1500cc cars (mid-‘70s) have a 3.7:1 ratio, but they are hard to find. Earlier Spridgets used 4.2:1.
It’s easy to change the center section of the rear end. Pull the floating axles out a few inches on each side, then unbolt the center section and install the new pumpkin.
This all went smoothly, I only had to make a slightly different bracket to mount the Tee for the brakes. However, later, when time came to fill it, I realized that there was no filler! As it turns out, the Morris had the filler on the front, but the later Sprites had the filler on the rear. So, mix the two and there’s no filler. To temporarily solve this problem, I carefully measured the correct amount of lube, then filled it from the vent at the top. Later, I drilled and tapped a hole into the differential housing for a plug. I'm really hoping I got all the metal chips out of there!
Incidently, the outer axle shafts are sealed with a paper gasket AND an o-ring. And they don't leak. I was surprised that they were using o-rings in those days - wish they would have used that technology other places in the car. Might have made a big difference in the British car industry. I read a couple places on the Internet that one could swap the rear axles with stronger Sprite axles. I tried that, only to find that the Sprite axles are a couple inches shorter than the Morris axles.
This must be an engine/transmission swap that’s made in heaven. The Datsun driveshaft bolts right in! It’s the correct length and the flange on the back bolts to the Morris differential.
By the way, between the 5-speed and 3.9:1 gearing change, at 55 MPH the car has gone from a busy 4,000 RPM to a relaxed 2,800 RPM. And it easily pulls it. At 4,000 RPM, instead of 55, it is now going 78 MPH, with surprised looks as you zoom by people on the freeway.
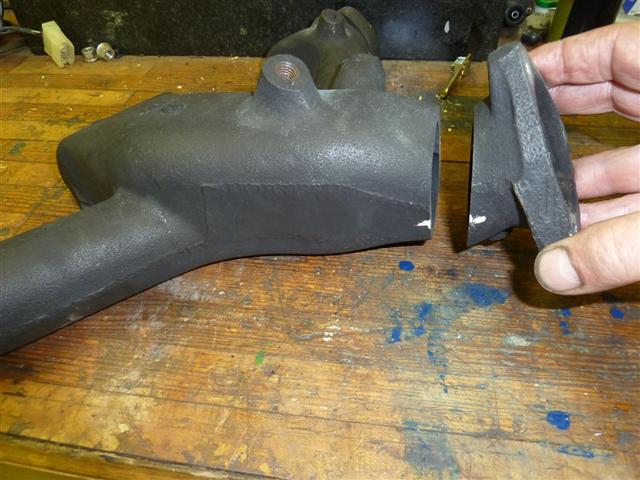
The exhaust manifold on the Datsun motor comes out pointing towards the chassis rather than the hole where the exhaust originally resided. To remedy this, I cut the exhaust manifold at an angle, rotated it around so the angles added up to make a fairly sharp bend, then had it welded up. Actually, I thought it would be welded, but they brazed it instead. I would have guessed that the melting point of brass is too low for an exhaust system, but it seems to be working fine in practice.
The local exhaust shop made a new exhaust pipe that is 1 ¾” diameter. The Morris original was only 1 ¼”, not enough for the increased displacement. The Datsun had a 1 ½” exhaust, still pretty small. The only initial glitch with the exhaust was that when the clutch was pressed almost all the way down, the pedal hit the exhaust pipe - easy mistake to make.
Also, initially we used a 14" muffler right under the drivers foot area. It sounded good going through the gears, but had a bit of a drone at highway cruising speeds. The addition of a 12" glass-pack back in the area where the exhaust goes over the rear axle greatly improved things. I'm not sure whether its better from having more muffling in total, or whether its better because it interupts the long open pipe in the rear, or a combination of the two things.
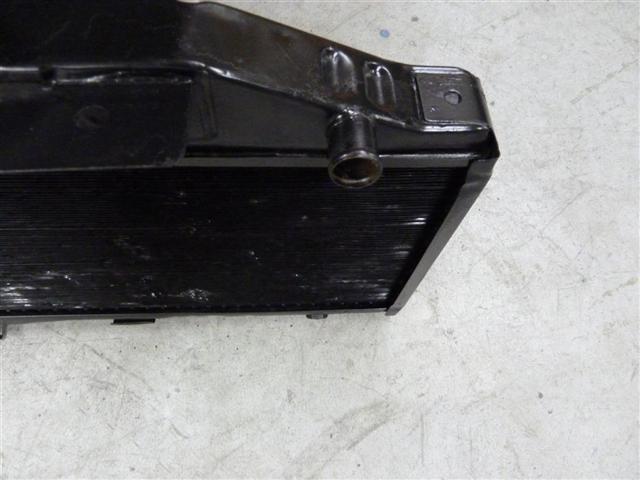
The original radiator on the Morris is big. I decided to use it with the new engine. The only change necessary was to have a radiator shop replace the angled top hose flange with a short straight flange. The original Datsun top radiator hose, when slightly shortened, then fit. On the bottom it was necessary to cut and splice the Datsun hose a couple of places. Splices look bad with all the hose clamps on the outside, but I found that Gates makes a black heat-shrink style hose clamp with adhesive inside. I just cut a couple short pieces of stainless tubing for inside the hose at the splice spots, then pushed the hose together and heated up the splices. Seems to work fine and looks a lot better than a bunch of normal clamps:

Here's the modified radiator - top outlet is straight instead of curved...
The heater hoses between the Datsun motor and Morris are the same size, a nice coincidence. The front hose from the Datsun fits right on. In the back of the Datsun cylinder head, though, the heater flange needs to be removed and plugged, otherwise it interferes with the cross member on the firewall which can’t be cut or notched for structural reasons. I installed an elbow at the left rear of the cylinder head for this radiator hose.
Speaking of coolant plugs, the original oval-port cylinder head on this motor has water outlets in the head for heating the intake manifold. It was necessary to plug these holes with my “dry” intake manifold setup.
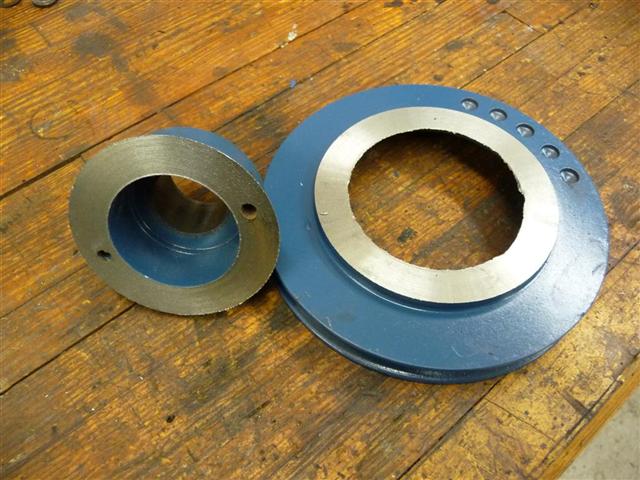
To make the front of the motor as short as possible, I found a racing crankshaft pulley that only has provisions for one belt. Originally, I put the stock pulley in my lathe and shortened it, only to find out that by the time you shorten it enough to remove the front pulley, the whole thing falls in half! Dang.
I also replaced the fan with a metal fan from a car at Pull-A-Part. It’s thinner than the stock Datsun fan, and being metal, less likely to flex and hit the radiator. It’s so close that I ended up with only two blades rather than four. The front two made it a little too close to the radiator. Seems to cool just fine though, many cars of an earlier era used two-bladed fans. The cooling system turned out to be very effective. The car seldom gets up to thermostat temperature, even on hot days sitting at traffic lights. This actually keeps the heater from being as warm as one would wish on colder winter days. Maybe I need radiator blinds!
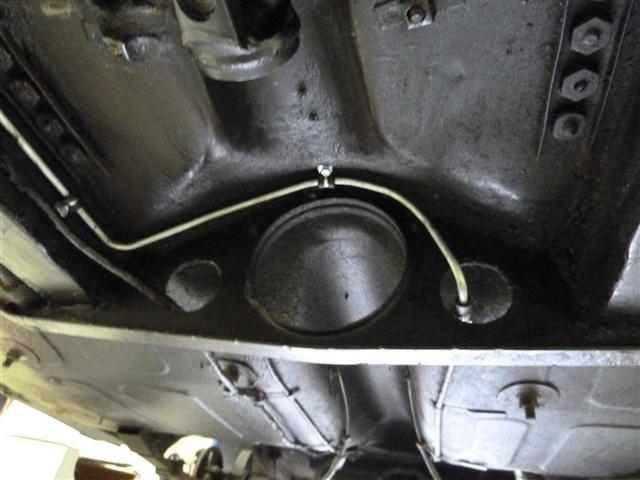
The throttle and choke cables hooked right up since they were originally for a single SU carb. I got rid of the original electric fuel pump (something to break, especially being an old British electro-mechanical part) and used the mechanical fuel pump on the Datsun motor. This required moving the fuel line under the car from the driver’s side to the passenger’s side.
Electrically, I wanted to use the Datsun alternator rather than the original Lucas charging system. This necessitated changing the car from positive ground to negative ground. No complications, just required new battery cables, and eliminating the regulator by connecting a few of its wires together. I used the original charge light on the dash to tell if it’s charging, and don’t feel compelled to put in an ammeter like on other British cars I have. I don’t even worry now about driving around with the lights on at night – I just expect the Japanese charging system to work. And since the Datsun motor has electronic ignition, there are no points either. It fires up instantly every time.
While I didn’t feel compelled to have an ammeter, the original Morris Minor didn’t have a temperature gauge, just a speedometer and fuel gauge. So I installed an aftermarket gauge set with temperature and oil-pressure. Don’t really need the oil pressure, but it doesn’t hurt. My original thought was to install these gauges in the dash on each side of the speedometer, but I decided not to cut holes in the dash and mounted them under the dash by the driver’s door.
When I was changing the wiring, I also eliminated the damaged factory fuse block and replaced it with a couple of in-line fuses. Now it would be tougher to hot-wire the car. Many British cars used this simple two-fuse block. One fuse is hot always, and the other hot with ignition on. So you can take out one of the fuses, and put it between the two fuse holders in the block, then you’re ready to fire it up and drive away – key or not. I learned this many years ago when I put a fuse back into the center accidently. Some of the fuse blocks have a molded peg in the middle to prevent this.
Not that most folks could fire up a car like this. Even if they could use a choke, it has a separate knob you pull to actuate the starter rather than using the key switch. I like that, and left that functionality in the car even though the Datsun motor has a modern solenoid that doesn’t need the pull switch any more.
After the wiring changes I thought I had screwed things up since a lot of things didn’t work, but I found that it was just a lot of separate little things. Bad ground here and there, bad dimmer switch, unplugged connector, burned out bulb, etc. After chasing down these various gremlims, everything has worked perfectly. It's refreshing to work on a car where the whole electrical system can be shown on one 8 ½ x 11 sheet of paper.
The original Morris brakes are pretty marginal, especially when you add a lot more power to the car. So I decided to switch the front over to disk brakes.
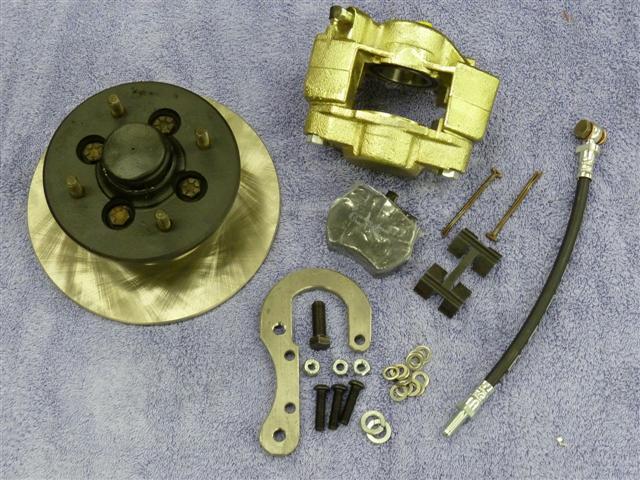
There's a kit available for this purpose, available from several sources. It uses the disk brakes from later Spridgets. The main element of the kit is a J bracket that bolts to the original Morris spindle assembly, and then to the Sprite calipers. In addition, you need hubs, disks and calipers from a later Spridget. The hubs need to be from a car without wire wheels to work properly on the Morris - unless, of course, you want to convert to wire wheels.
Here's a picture of all the goodies to convert one side, everything is new or refurbished in this case:
The hose shown isn't the correct one, later I found that you use one from the Morris rather than the Sprite. I originally thought a banjo fitting was required on the caliper side, as it was equipped from the factory. Also, I found that you have to be careful replacing wheel bearings - even though the inner ones look pretty symmetrical, there's a right way and a wrong way to install them.
Everything bolted together pretty easily, although it took a little machining on the disks to make enough clearance. According to the instructions, this is sometimes, but not always necessary.
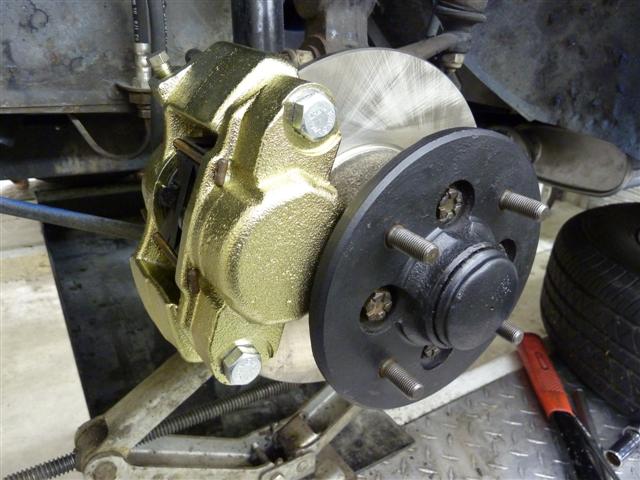
When all done, each side looks like this...
Unfortunately, the new brakes are over seven pounds heavier than the original - that's on each side of the car, and unsprung weight.
Originally I had a problem with a lot of squeaking when I pressed on the brakes. I tried a couple different types of chemical-goo solutions from the local parts store, but the squeaking resumed after a couple of weeks. I then found that Moss Motors sells some backing plates for the pads that completely solved the problem.
How do they work? Well, pretty well. Better than the originals, but nothing like modern cars. I doubt that you could lock the wheels. Maybe this is sort of a period anti-lock brake system. Actually, part of the problem is that the Sprite donor brakes are designed to fit within 13" wheels. With these 14" wheels, the disks could have been significantly larger.
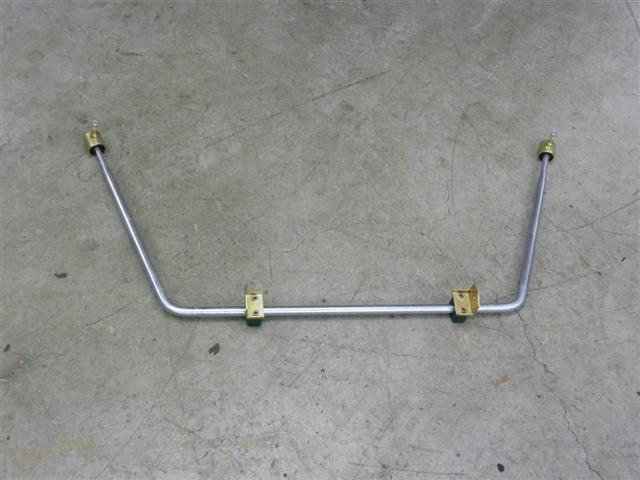
I decided to install a front sway bar that I had ordered earlier. This was before I installed the wider wheels, which greatly improved the road feel. I probably wouldn't have ordered it had I known what a difference the wheels made, however, when installed, I was surprised how much difference it makes - I think the Morris might surprise some vintage sports cars on a curvey road now. It doesn't upset the ride comfort either.
Here's the raw kit:
This is what it looks like installed, just takes one new bolt hole on each side to install:
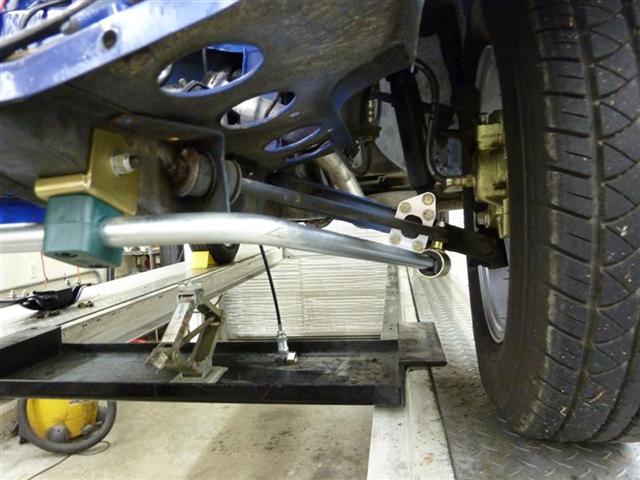
Behind the sway bar, you can see the mounts I made to connect the lower control arms to telescopic shocks.
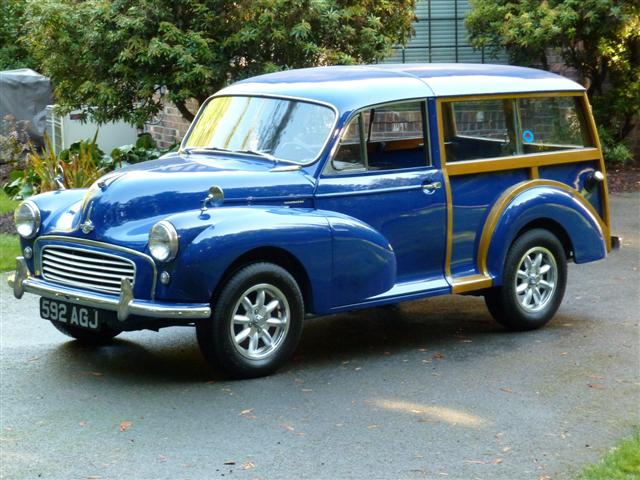
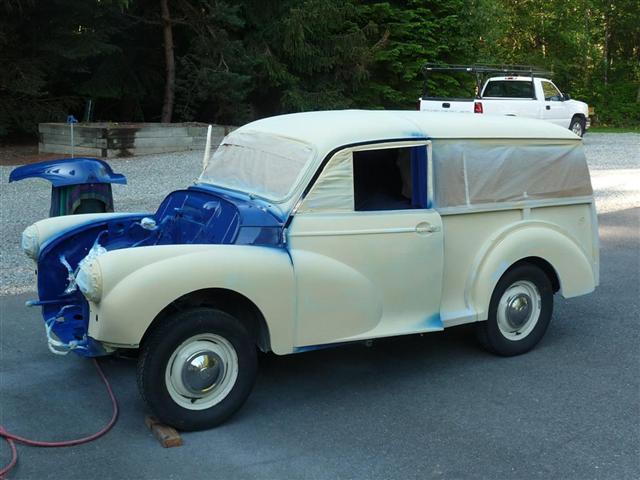
As I mentioned, I was really disappointed in the paint job on the car. The large crazed sections of paint looked horrible. I initially tried to fix that by painting it at home, but wasn’t successful. My brother Mark was kind enough to help sand and prepare the body - a lot of work, but I wasn’t able to spray the car well enough at home. Lots of bugs, areas that didn’t wet out well enough during overlapped spraying, runs, and so on – a lack of skill on my part. Here it is primered and starting to do some color.
After painting, when rubbing it out it became clear that not only would it take a huge amount of time to rub out every panel, but also by the time each section was rubbed out, the paint somewhere on it ended up too thin and would need to be sprayed again, and then the process would have to start over. And it wasn’t summer anymore - the days of weather dry and warm enough to paint outside were gone. So I took it to a local body shop and had them spray it. I should have done that the first time. By taking it to them with all the trim removed and the body work done, it wasn’t too expensive. I have a lot of respect for folks with the skill, knowledge and energy necessary to do good body and paint work.
I found some Minilite-style 14” wheels for it. These are fairly hard to come by since the Morris wheels have a 4-bolt by 4” pattern, which is shared with only a few cars, such as Sprites, Midgets, Vega’s and the like. Cars that were only offered with 13” wheels. 4x100mm pattern is close, but off by about 1/16”. I like the look of the original steel wheels with their simple hubcaps, but the car had a little vibration problem, even with new tires, and the original rims are only 4” wide. They also aren't supposed to be used with tubeless tires since there are rivets in the rim. The alloy replacement wheels are 5 ½” wide. It makes a big difference in the handling of the car to have wider rims, maybe more so since I’m using fairly wide tires (185-70x14”).
Later I discovered that it still had some vibration, and ultimately traced it down to two of the new tires, that even though balanced properly, caused some vibration. I replaced those and it's smooth now at all speeds. Part of this is that the car is light compared to the tires, so it doesn't take much tire out-of-round or imbalance to be noticed. I had the same problem with inexpensive new tires on a Chevy Sprint that I used to own.
The back of the Morris was making a lot of noise when going over bumps. The rear leaf springs looked a little rough with some loose clips, I could feel play in the linkage to the lever-action shocks (I mean "dampers"), and the rubber bushings appeared to be the originals. So I contacted a British on-line supplier and discovered that the parts were less than half the price of other state-side sources I found, even if they did have the parts in stock. I ordered them, and asked them to invoice the shipping when they knew the exact amount. I learned not to be so cavalier about shipping charges, they turned out to be more expensive than the parts. I suppose the significant weight of the springs was the main issue.
Stock, the Morris saloon is listed as having 5-leaf springs, and the Traveller 7-leaf springs. So I ordered the 7-leaf variety, but discovered that the originals were 9-leaf. When I had things apart, I also found that one of the lever-action shocks wasn't working properly. That was remedied by refilling it with oil. The result of rebuilding the rear suspension is very noticable, with a quieter, more comfortable ride. Not that anyone will confuse the quietness with that of a Lexus, but now it's down to mostly squeaks and groans rather than thunks. Note: the shock that was initially low on oil continued to leak (only leak in the car!), so I replaced it with a rebuilt lever-arm shock. Turns out the original was making noise too, and this eliminated one more squeak. While you hear a lot of disgruntled talk about Armstrong lever-action shocks, they actually work well when in good condition. I think most people form their opinions from worn-out cars. Same is true of most Lucas-electrical stories - my experience is that most British electrical problems are caused by corroded connections after the car is many years old.
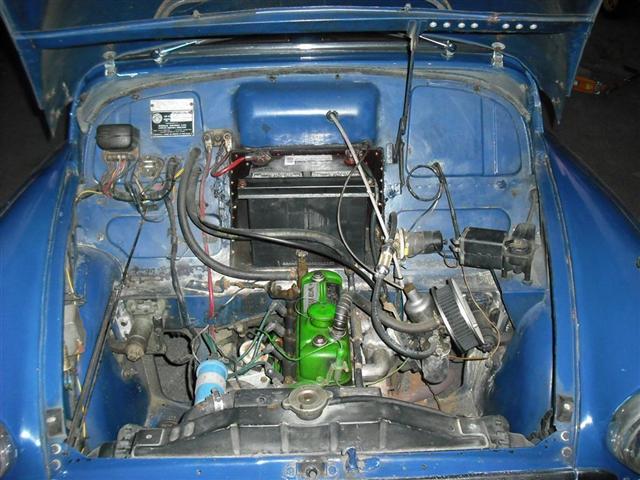
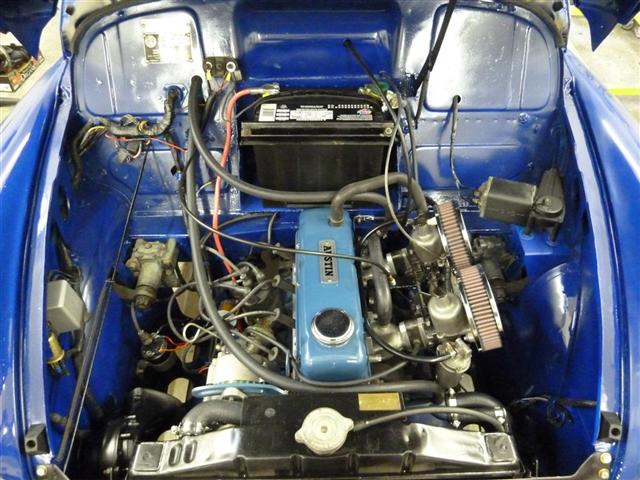
Here are before and after shots of the engine compartment. Without a direct A-B comparison, few people can look in there and think that this wasn't the factory motor for the Morris. I suppose I should have painted the new motor olive drab too, but I couldn't make myself do it.
I might lower the front a little. You can change the spline position on the front torsion bars, with each spline increment raising or lowering the car by about 1 ½”. Smaller adjustments are available within each spline setting. And, of course, there are always numerous details that one could spend time on if they wished.
I couldn’t find a source with a catalog that shows all the Morris parts, along with price and availability, such as those available for more popular British cars from Moss Motors or Victoria British for Sprites, MGs, etc. The sources I found generally required that you call, describe the part, ask if they have it, then find out the price and make an on-the-spot decision about whether to order it. Some places have small Morris catalog sections, but they are not very comprehensive. Or you need to work with overseas suppliers, such as when I got my wheels. Fortunately, most of the mechanical and electrical parts are shared with other, more popular, British cars, so you can shop for these parts in catalogs, but sometimes there’s a question of whether the part is really a shared part, or slightly different. Maybe, as the years go by, there will be increased interest in Morris Minors, and this will change.
If you're considering doing a similar project, you might want to make sure that you can round up the engine rebuilding parts in advance. Some of the parts (like pistons) for the A15 Nissan motor are getting tough to find. The A14 engine was used for many more years (and cars), so parts availability is better.
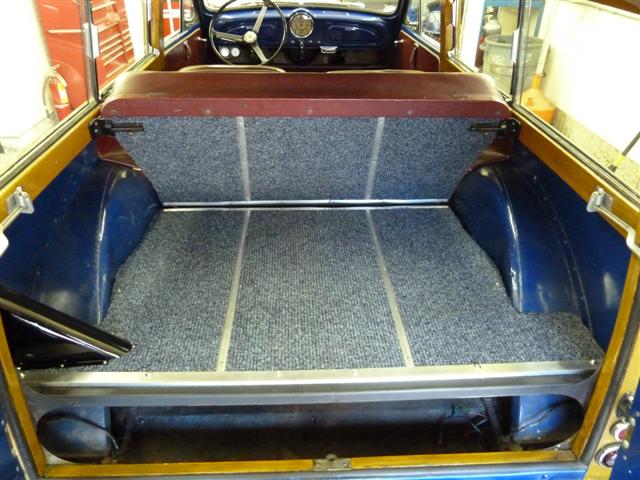
I really enjoy this car. It’s big enough for four full-sized people if need be, or with a huge cargo area and two people. Here's the boot with the rear seat in passenger position. The spare tire and tool kit reside below the deck so you can get it out, even with a full load.
Easy to park, and very fuel efficient. It’s too bad you can’t buy new cars like this today, but you would never get all the modern government-mandated stuff into a small, light, efficient package such as this.
And I like how it looks - I smile every time I walk up to it. And my daughter’s comment, when first seeing it, was “How can you have a bad day when you are in a car like that?” I agree.